How to Enable the new Settings App Option in Windows 11 (23471) => Watch On YouTube
Unlock Hidden Features: How to Enable an Experimental Settings Option in Windows 11
Windows 11 is constantly evolving, and sometimes, new features are hidden away before their official release. If you’re eager to get a sneak peek at an experimental new "Settings app option," this guide will walk you through the process of enabling it using a special tool called ViveTool.
Important Note: This is an experimental feature and may not be fully functional or appear on all systems immediately. Proceed with caution.
Step 1: Download ViveTool
First things first, you’ll need to download ViveTool, a command-line utility that allows you to enable or disable hidden Windows features.
- Navigate to GitHub: Open your web browser and go to the ViveTool GitHub repository. You can typically find it by searching "ViveTool GitHub."
- Download the Latest Version: On the GitHub page, scroll down and look for the latest
.zipfile release of ViveTool (e.g., ViveTool v0.3.3 or a newer version). - Save the File: Click on the
.zipfile link, and it will begin downloading to your computer (usually in your browser’s bottom-left corner).
Step 2: Extract ViveTool to System32
Once downloaded, you need to extract the ViveTool files to a specific location on your Windows system.
- Open the Downloaded File: After the download is complete, click the arrow next to the downloaded
.zipfile and select "Open" or navigate to your Downloads folder and open the.zipfile. - Extract All: In the File Explorer window that opens, you’ll see an "Extract All" button. Click it.
- Choose Destination:
- Click "Browse."
- Navigate to "This PC" > "Windows" > "System32."
- Click "Select Folder."
- Extract and Replace: Click "Extract." If prompted to replace files in the destination, confirm by clicking "Replace the files in the destination."
Step 3: Enable the Feature via Command Prompt
Now that ViveTool is in place, you can use the Command Prompt to activate the new settings option.
- Open Command Prompt as Administrator:
- Go to the Windows search bar (or press
Win + S). - Type "CMD."
- Right-click on "Command Prompt" in the search results and select "Run as administrator."
- Go to the Windows search bar (or press
-
Enter the Command: In the Command Prompt window, type the following command exactly as it appears and then press
Enter:vivetool /enable /id:4097072
- Confirmation: You should see a message stating, "Successfully set feature configurations." This indicates the command was executed correctly.
Step 4: Restart Your Computer
For the changes to take effect, you must restart your Windows 11 computer.
- Restart: Go to your Start Menu, click the power icon, and select "Restart."
Step 5: Locate the New Settings Option (and Expectations)
After your computer restarts, you can try to find the newly enabled setting.
- Open Settings: Go to your Start Menu and click on the "Settings" icon.
- Navigate to Privacy & Security: In the Settings app, click on "Privacy & Security" in the left-hand navigation pane.
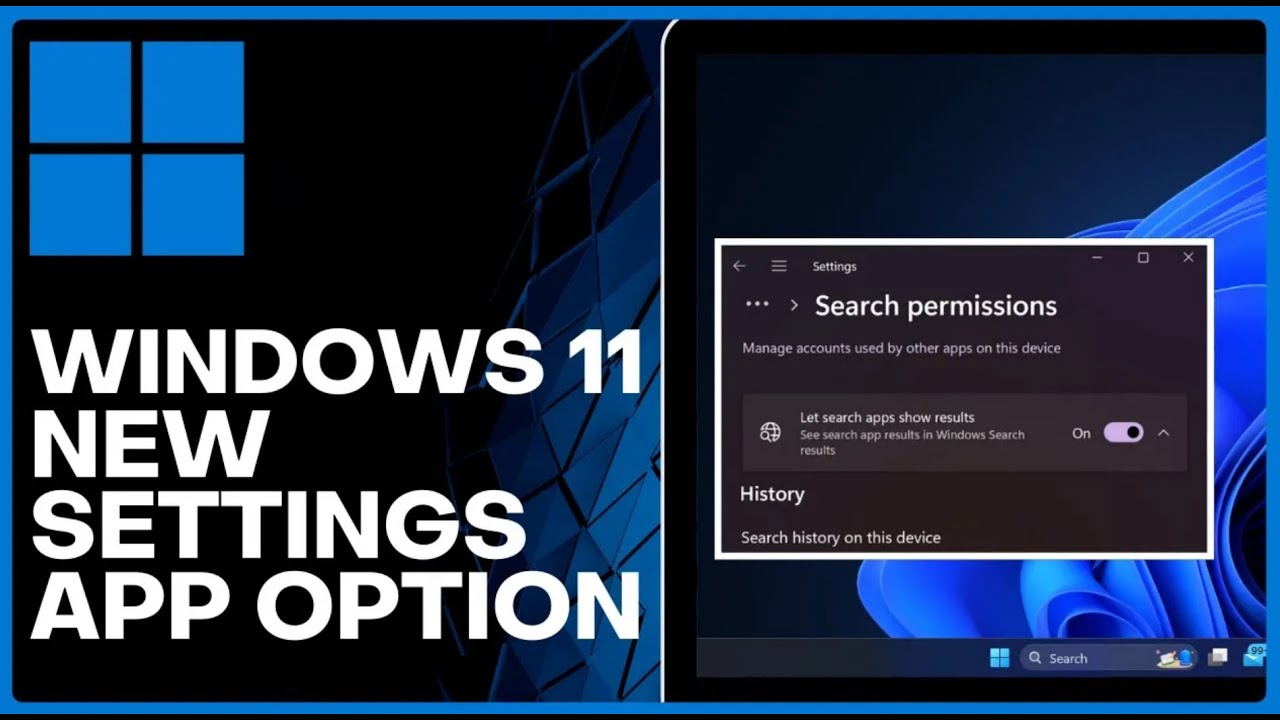
- Find Search Permissions: Scroll down and click on "Search permissions."
- Look for the New Option: Within the "Search permissions" section, you might find a new option that reads something like: "Let search app show results in Windows Search rituals."
A Word on Experimental Features:
Keep in mind that this is a hidden or experimental feature. As noted, it might not be fully visible or functional on all updated Windows 11 versions (such as 23471 or later builds) right away. Its exact behavior and purpose might also change as Microsoft continues development. It appears to relate to how apps display results within the Windows search experience, potentially offering more control over what content appears.
By following these steps, you’ve successfully enabled an experimental settings option in Windows 11. While its full functionality might still be under wraps, you’re now one step closer to exploring upcoming features!