How to Allow or Block a Website on Chrome Laptop 2025 => Watch On YouTube
Here’s an article based on the transcript, tailored for a US audience:
Fast Fix: How to Easily Block or Unblock Websites on Google Chrome
Hey everyone! Welcome back to Fast Fix. Today, we’re tackling a common request: how to allow or block a website right from your Chrome browser. Whether you’re trying to stay focused, manage screen time, or just want to avoid certain sites, this quick guide will show you how using a handy Chrome extension.
Let’s dive in!
Step 1: Open Chrome and Head to the Web Store
First things first, fire up Google Chrome on your computer. Once it’s open, head over to the search bar and type in "Web Store extension". Look for the "Chrome Web Store" link in the search results and give that a click.
Step 2: Find and Install the "Block Site" Extension
Once you’re on the Chrome Web Store homepage, find the search box on the left-hand side and type "Block Site" then hit Enter.
You’ll see an extension called "Block Site – Block Website & Stay Focused". This is the one we want! Go ahead and click on this extension.
On the next page, you’ll want to click the "Add to Chrome" button to install it. Confirm any prompts that pop up.
Step 3: Pin the Extension for Easy Access
After "Block Site" is added, you might see a pop-up confirmation. To make the extension easy to access, click on the puzzle piece icon (Extensions) in your browser’s toolbar (usually top right). Find "Block Site" in the list and click the pin icon next to it. This will add the Block Site icon directly to your toolbar.
Step 4: Set Up and Block Your First Website
- Click the newly pinned Block Site icon in your toolbar.
- You’ll likely need to click "Agree" to their terms and conditions.
- Next, look for the "Settings" gear icon in the top right corner of the Block Site pop-up and click that.
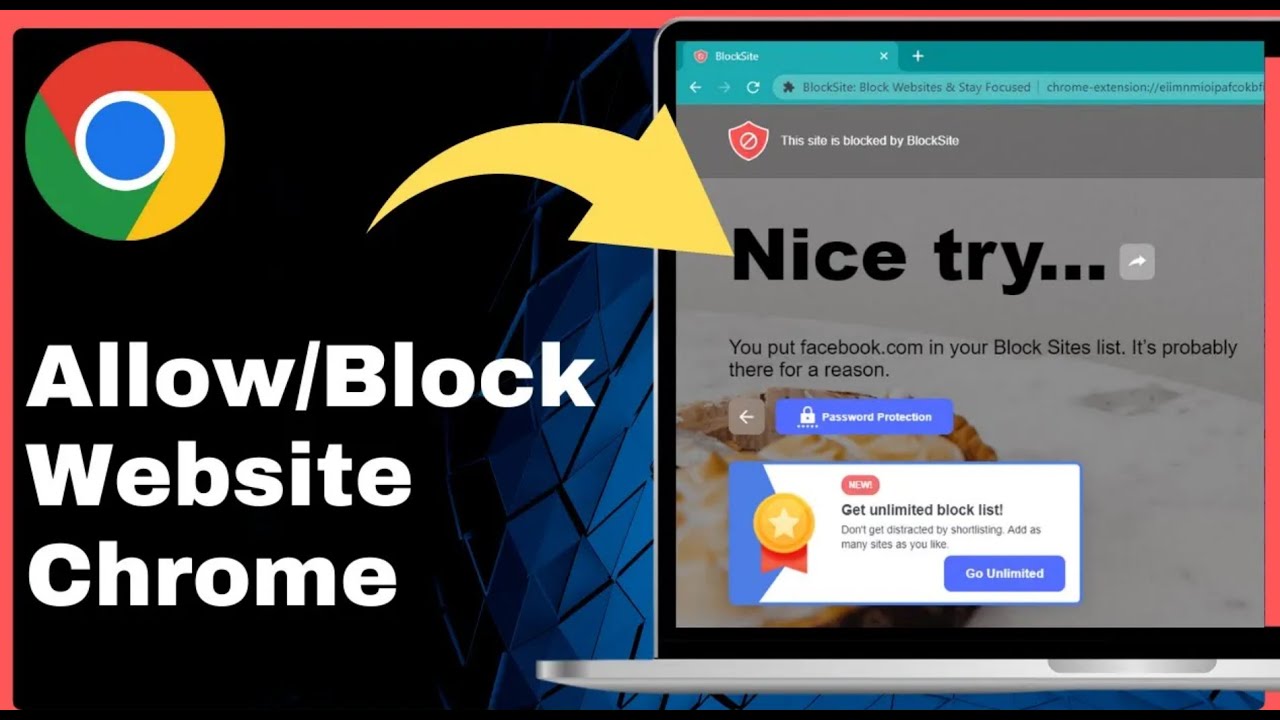
- From the settings page, you’ll see an option to "Add a Blacklist." Click that, then simply type in the full URL of the website you want to block – for example, "facebook.com".
- Once you’ve added it, click "Done."
Step 5: Test Your Block!
Now, let’s test it out! Open a new tab and try navigating to the website you just blocked (e.g., facebook.com). You should see a message confirming, "This site was blocked." Success!
Step 6: Unblock or Allow a Website
Want to unblock a site? No problem!
- Go back to your Block Site settings by clicking the pinned extension icon and then the gear icon.
- Find the website on your blacklist.
- Click the "trash can" icon next to it.
Voila! That website is now unblocked and accessible again.
And there you have it! A super simple way to manage website access on your Chrome browser using the Block Site extension. This can be a game-changer for productivity, digital wellness, or just keeping certain content away.
If you found this guide helpful, consider sharing it with friends or bookmarking our page for more quick fixes and tech tips!