How To Deactivate Facebook Account (Tutorial) => Watch On YouTube
Here’s how to temporarily deactivate your Facebook account in 2023:
How to Deactivate Your Facebook Account in 2023 (Take a Temporary Break)
Thinking about taking a break from Facebook? Whether you need some time away, want to reduce your digital footprint temporarily, or just clear your head, deactivating your account is a straightforward process. This guide will walk you through the steps to temporarily disable your Facebook account in 2023, ensuring your name and photos are removed from most shared content without permanently deleting anything.
Let’s dive in!
Step-by-Step Guide to Deactivating Your Facebook Account:
- Open the Facebook App: Start by launching the Facebook app on your mobile device.
- Access Your Profile Menu: Tap on your profile icon, which you’ll find at the top-right corner of your screen.
- Navigate to Settings & Privacy: Scroll down a bit until you see and tap on Settings & Privacy.
- Go to Settings: From the "Settings & Privacy" menu that expands, tap on Settings.
- Find Access and Control: Scroll down within the settings menu until you locate and select Access and Control. Just tap on that option.
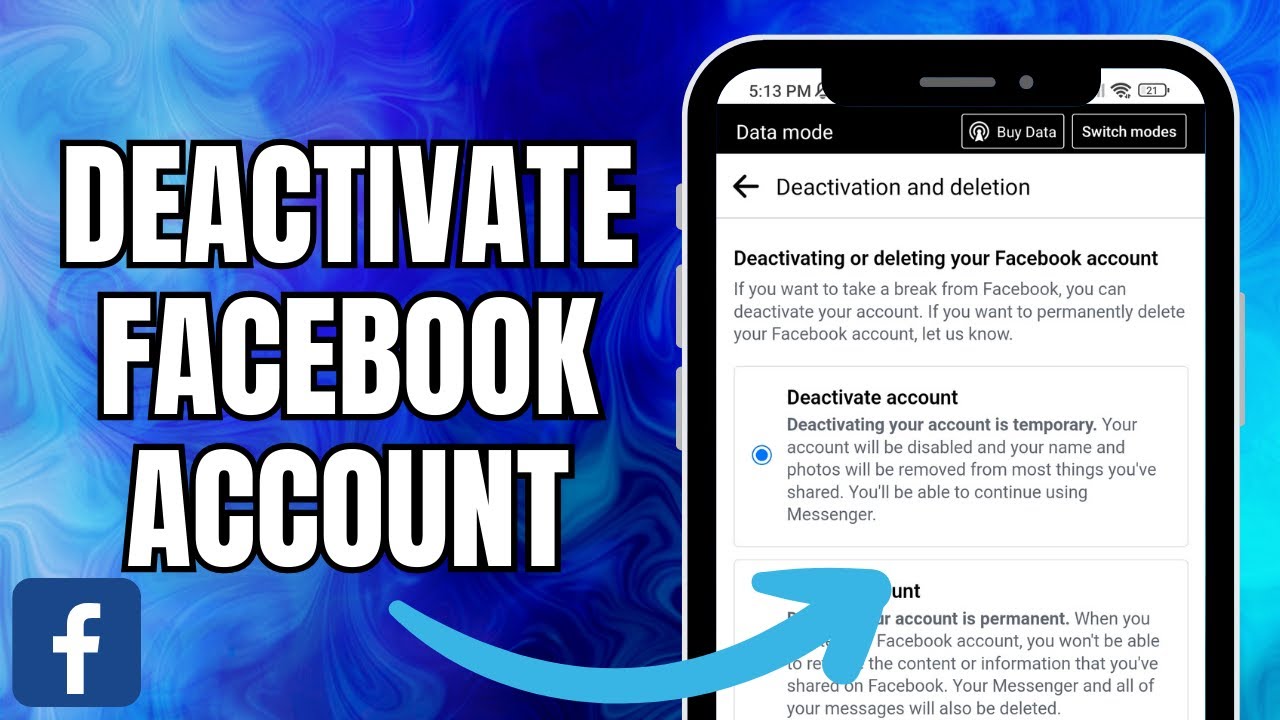
- Choose Deactivation and Deletion: You’ll see an option here called Deactivation and Deletion. Go ahead and tap on it.
- Select Deactivate Account: On this screen, you’ll be presented with two choices. Make sure to choose Deactivate Account – this is the temporary option. Facebook clearly states: "deactivating your account is temporary. Your account will be disabled, and your name and photos will be removed from most things you’ve shared." Once you’ve selected it, tap Continue.
- Confirm Linked Profiles/Pages: If you manage any Facebook Pages or have linked profiles, you’ll see a list of them here. These will also be deactivated alongside your main profile. Tap Continue to proceed.
- Enter Your Password: For security purposes, you’ll need to retype your password to confirm that it’s actually you initiating the deactivation.
- Provide a Reason: Facebook will ask you for a reason why you’re deactivating your account. For a temporary break, choosing "This is temporary, I’ll be back" (often the first option) is usually the most fitting. After selecting your reason, tap Continue.
- Review Final Details: You’ll see a final screen with important information about taking a break and how to reactivate your account. Pay close attention to the note about ensuring you still have access to the email address or phone number linked to your profile, as you’ll need it to log back in and reactivate.
Reactivating Your Account:
Remember, deactivating your account is not permanent deletion! You can log back into your Facebook account anytime using your original login credentials (the email or phone number and password you used before). Simply logging back in will automatically reactivate your profile and restore all your content and connections.
And there you have it! Your Facebook account is now temporarily deactivated. It’s a quick and easy way to step away from social media without losing your profile and cherished memories forever.
If you found this guide helpful, give it a thumbs up!